
So you’ve had an Achilles tear? Follow these principles to get yourself back to action.
It can be discouraging to athletes when a tear or rupture of the Achilles tendon occurs. But even if surgery is required, there is a silver-lining knowing that there are some tried-and-true protocols to follow that can get athletes back to pre-injury performance. Take control of the rehabilitation process by following these simple protocols:
1. Foot Position
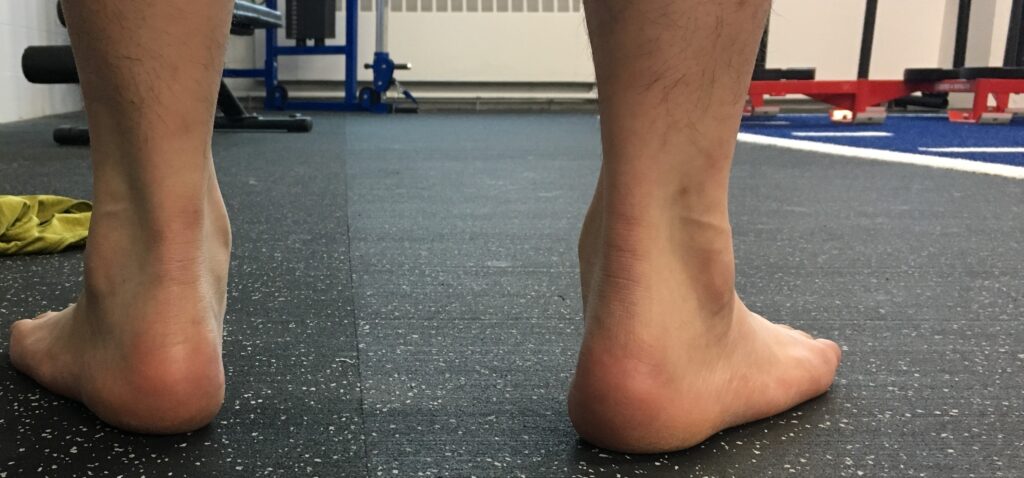
Foot position matters because everted feet may place extra strain on the Achilles tendon during impact forces like the ones that the the feet encounter during sprinting and jumping which are called, “tensile forces.” Everted feet place more torque on the tendon during these types of exercises, making it more vulnerable to tears and ruptures. Everted feet are also subject to more foot pronation, placing the tendon on a mild stretch, and resulting in the same vulnerability. If this is you, you can work on improving your foot position and getting it closer to neutral by performing soft-tissue work on the Deep 6 and the Peroneal group. The Deep 6 are muscles deep within the hip joint that control the rotation of the femur (leg bone) at the hip. The Peroneals are muscles located along the outside of the lower shins and can pull the foot out of a neutral position and into eversion. Reducing the tone in these muscles, followed by strengthening the muscles in the sole of the foot, can help return the foot to a more neutral position which is safer for the Achilles during sprinting and jumping.
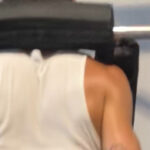
A. Everted Foot:
B. Release the Deep 6 through the side of the hips:
C. Use the Short Foot (press- do not curl, the tip of the big toe into the floor to rebuild the foot arch):
D. Supine Walks can help stretch the peroneals and activate the tibialis posterior which helps rebuild the arch
2. Strength Training
Tendons love to be loaded. The loads experienced while strength training stiffen the tendons, increasing their work capacity and resiliency. After injury, the rest period reduces the work capacity of the tendon because of disuse. This means that training sessions, competitions, or practices which would not have strained the tendon before might become debilitating. Contrary to popular belief, it is not plyometrics that help rebuild the tendon. Plyometrics help to condition and teach the tendon to use its stiffness quickly, and we need that, but they are also what wear the tendon down. Structured, unilateral strength work in the gym is the best way to restore the work capacity of your tendons and bring them back to performance-level health.
Early on, isometrics that avoid compression (more on compression below) are a good option for strength work in the beginning because not only will they not irritate the tendon, but they will also help maintain its work capacity. When progressing toward isotonic work, pay attention to controlled eccentric actions.
3. Tensile Forces: Low to High
Tensile forces are very fast/deep stretching and contracting actions that occur in tendons like those we see in landing and jumping or changing direction. As the Achilles gets healthy, re-introduce low grade jumps and landings. Low-intensity, double-tap jump variations as shown below can be a good place to start because you can easily monitor and progress the volume of the exercise from a small distance or a few hurdles toward longer distances and more hurdles.
4. Compressive Loads
Any positions requiring deep dorsi-flexion (a reduced angle between the foot and the shin) place compressive loads on the Achilles. Avoid these positions until they no longer irritate the tendon and re-introduce them SLOWLY!
5. Tensile Loads with Compression
An example of this is a cut or a direction change. In these movements the foot and shin come closer together (the knees travel forward past the toes) and there is also a stretch and contraction of the Achilles tendon. Another example would be a “back” or “plyo” step that involve the same combination of mechanisms. These are later-stage, higher-impact movements that you should avoid until the other types of loading have proven to be safe following the 24hr rule (more on this below). Avoid combinations of compression, speed and load early on (the action in the video below is an example of such a combination. Watch the action of the foot that steps back).
6. Stretching and the 24hr Rule
If the tendon is sore the next morning after activity, it means you did too much. Reduce the volume in your program, whatever it is (training or sports practice). If the tendon is not sore the next morning, then you have probably found a good routine, so try adding a tiny bit of volume/intensity and repeat the process again. And whatever you do, do not stretch a healing tendon. Use this 24hr rule to gauge the improvement of your tendon’s health.
This post describes some of the ways in which you can monitor your progress through the healing process and avoid the setbacks that come from trying to do too much too soon. For more details about training protocols to use for a safe return to performance contact us through the Contact page.
Happy Training!